
一、Nginx基础入门
什么是Nginx?
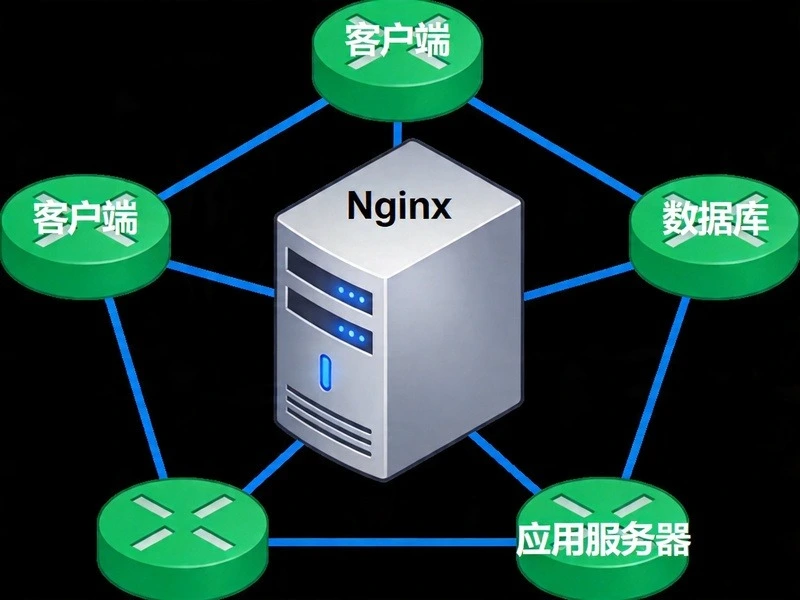
Nginx(发音为”engine-x”)是一款高性能的开源HTTP服务器和反向代理服务器,由俄罗斯程序员Igor Sysoev于2004年首次发布。它的特点包括:
- 高并发:基于事件驱动架构,支持数万并发连接
- 低内存消耗:相比Apache更节省服务器资源
- 热部署:配置变更无需重启服务
- 模块化设计:丰富的官方和第三方模块
安装Nginx
Ubuntu/Debian系统:
bash
# 更新软件源
sudo apt update

# 安装Nginx
sudo apt install nginx

# 启动服务
sudo systemctl start nginx
sudo systemctl enable nginx

# 检查状态
sudo systemctl status nginx
CentOS/RHEL系统:
bash
# 安装Nginx
sudo yum install epel-release
sudo yum install nginx

# 启动服务
sudo systemctl start nginx
sudo systemctl enable nginx
Docker方式:
bash
# 快速启动
docker run -d \
  --name nginx \
  -p 80:80 \
  -p 443:443 \
  nginx:alpine

# 自定义配置启动
docker run -d \
  --name nginx \
  -p 80:80 \
  -v /path/to/nginx.conf:/etc/nginx/nginx.conf:ro \
  nginx:alpine
验证安装
安装完成后,在浏览器访问服务器IP地址,应该能看到Nginx的默认欢迎页面:
bash
# 检查Nginx版本
nginx -v

# 测试配置文件语法
nginx -t

# 查看详细版本信息
nginx -V
二、Nginx核心配置结构
配置文件结构
Nginx的配置文件通常位于/etc/nginx/nginx.conf,采用层级结构:
nginx
# 全局块
user nginx;
worker_processes auto;
error_log /var/log/nginx/error.log warn;
pid /var/run/nginx.pid;

events {
    # events块
    worker_connections 1024;
}

http {
    # http块
    include /etc/nginx/mime.types;
    default_type application/octet-stream;

    # 日志格式定义
    log_format main '$remote_addr - $remote_user [$time_local] "$request" '
                    '$status $body_bytes_sent "$http_referer" '
                    '"$http_user_agent" "$http_x_forwarded_for"';

    access_log /var/log/nginx/access.log main;

    # 服务器块
    server {
        listen 80;
        server_name example.com;

        # 位置块
        location / {
            root /usr/share/nginx/html;
            index index.html;
        }
    }
}
常用配置指令
nginx
# 全局配置
user nginx;                    # 运行Nginx的用户
worker_processes auto;          # 工作进程数(auto为CPU核心数)
error_log /path/to/log;        # 错误日志路径
pid /path/to/pid;              # PID文件路径

# events块配置
events {
    worker_connections 1024;    # 单个工作进程最大连接数
    use epoll;                  # 使用epoll多路复用(Linux)
    multi_accept on;            # 一次接受多个连接
}

# http块配置
http {
    # Mime类型
    include /etc/nginx/mime.types;
    default_type application/octet-stream;

    # 连接管理
    keepalive_timeout 65;      # 长连接超时时间
    keepalive_requests 100;     # 长连接最大请求数

    # 文件传输
    sendfile on;                # 高效文件传输
    tcp_nopush on;              # 优化TCP传输
    tcp_nodelay on;             # 禁用Nagle算法

    # Gzip压缩
    gzip on;
    gzip_types text/plain application/json application/javascript text/css;
    gzip_min_length 1000;
}
三、静态网站托管配置
基本静态站点
nginx
server {
    listen 80;
    server_name mysite.com;

    # 网站根目录
    root /var/www/mysite;

    # 默认索引文件
    index index.html index.htm;

    # 访问日志
    access_log /var/log/nginx/mysite_access.log;
    error_log /var/log/nginx/mysite_error.log;

    # 默认location
    location / {
        try_files $uri $uri/ =404;
    }

    # 静态资源缓存
    location ~* \.(jpg|jpeg|png|gif|ico|css|js)$ {
        expires 30d;
        add_header Cache-Control "public, immutable";
    }

    # 不记录静态资源的访问日志
    location ~* \.(jpg|jpeg|png|gif|ico|css|js)$ {
        access_log off;
    }
}
目录浏览功能
nginx
server {
    listen 80;
    server_name files.mysite.com;

    autoindex on;               # 开启目录浏览
    autoindex_exact_size off;   # 显示文件大小(人性化显示)
    autoindex_localtime on;     # 显示本地时间

    location / {
        root /var/www/files;
        charset utf-8,gb2312;  # 解决中文文件名乱码
    }
}
四、反向代理配置
基本反向代理
反向代理是Nginx最常用的功能之一,用于将请求转发到后端服务器:
nginx
server {
    listen 80;
    server_name api.mysite.com;

    location / {
        # 转发到后端服务器
        proxy_pass http://127.0.0.1:3000;

        # 传递真实IP给后端
        proxy_set_header Host $host;
        proxy_set_header X-Real-IP $remote_addr;
        proxy_set_header X-Forwarded-For $proxy_add_x_forwarded_for;
        proxy_set_header X-Forwarded-Proto $scheme;

        # 超时设置
        proxy_connect_timeout 60s;
        proxy_send_timeout 60s;
        proxy_read_timeout 60s;

        # 缓冲设置
        proxy_buffering on;
        proxy_buffer_size 4k;
        proxy_buffers 8 4k;
    }
}
代理到HTTPS后端
nginx
server {
    listen 80;
    server_name secure.mysite.com;

    location / {
        proxy_pass https://backend-server.com;

        # SSL相关头
        proxy_set_header Host $host;
        proxy_set_header X-Real-IP $remote_addr;
        proxy_set_header X-Forwarded-For $proxy_add_x_forwarded_for;

        # 跳过SSL证书验证(内部网络使用)
        proxy_ssl_verify off;
    }
}
WebSocket反向代理
nginx
server {
    listen 80;
    server_name ws.mysite.com;

    location /ws {
        # WebSocket代理
        proxy_pass http://127.0.0.1:8080;

        # WebSocket必须的头
        proxy_http_version 1.1;
        proxy_set_header Upgrade $http_upgrade;
        proxy_set_header Connection "upgrade";

        # 超时设置(WebSocket需要较长超时)
        proxy_read_timeout 86400;
        proxy_send_timeout 86400;
    }
}
五、负载均衡配置
轮询负载均衡
nginx
# 上游服务器组
upstream backend {
    server 192.168.1.10:8080;
    server 192.168.1.11:8080;
    server 192.168.1.12:8080;
}

server {
    listen 80;
    server_name mysite.com;

    location / {
        proxy_pass http://backend;
        proxy_set_header Host $host;
        proxy_set_header X-Real-IP $remote_addr;
        proxy_set_header X-Forwarded-For $proxy_add_x_forwarded_for;
    }
}
加权轮询
nginx
upstream backend {
    # 根据服务器性能分配权重
    server 192.168.1.10:8080 weight=5;    # 权重5
    server 192.168.1.11:8080 weight=3;    # 权重3
    server 192.168.1.12:8080 weight=2;    # 权重2(备用)
}
IP哈希负载均衡
同一IP的请求始终发送到同一后端服务器:
nginx
upstream backend {
    ip_hash;
    server 192.168.1.10:8080;
    server 192.168.1.11:8080;
    server 192.168.1.12:8080;
}
最少连接负载均衡
将请求发送到当前连接数最少的服务器:
nginx
upstream backend {
    least_conn;
    server 192.168.1.10:8080;
    server 192.168.1.11:8080;
    server 192.168.1.12:8080;
}
健康检查
nginx
upstream backend {
    server 192.168.1.10:8080 max_fails=3 fail_timeout=30s;
    server 192.168.1.11:8080 max_fails=3 fail_timeout=30s;
    server 192.168.1.12:8080 backup;  # 备用服务器
}
六、SSL/HTTPS配置
生成SSL证书
使用Let’s Encrypt免费证书:
bash
# 安装certbot
sudo apt install certbot python3-certbot-nginx

# 获取并自动配置证书
sudo certbot --nginx -d example.com -d www.example.com

# 手动验证并获取证书
sudo certbot certonly --webroot -w /var/www/html -d example.com -d www.example.com
HTTPS服务器配置
nginx
server {
    listen 80;
    server_name example.com www.example.com;

    # 强制跳转到HTTPS
    return 301 https://$server_name$request_uri;
}

server {
    listen 443 ssl http2;
    server_name example.com www.example.com;

    # SSL证书配置
    ssl_certificate /etc/letsencrypt/live/example.com/fullchain.pem;
    ssl_certificate_key /etc/letsencrypt/live/example.com/privkey.pem;

    # SSL安全配置
    ssl_protocols TLSv1.2 TLSv1.3;
    ssl_ciphers 'ECDHE-ECDSA-AES128-GCM-SHA256:ECDHE-RSA-AES128-GCM-SHA256';
    ssl_prefer_server_ciphers off;

    # HSTS(HTTP严格传输安全)
    add_header Strict-Transport-Security "max-age=31536000" always;

    # OCSP stapling
    ssl_stapling on;
    ssl_stapling_verify on;
    resolver 8.8.8.8 8.8.4.4 valid=300s;

    root /var/www/example;
    index index.html;

    location / {
        try_files $uri $uri/ =404;
    }
}
HTTP/2配置
nginx
server {
    listen 443 ssl http2;
    # ...
}
七、性能优化配置
Gzip压缩
nginx
http {
    gzip on;
    gzip_disable "msie6";

    # 压缩级别(1-9,默认5)
    gzip_comp_level 6;

    # 最小压缩长度
    gzip_min_length 1000;

    # 压缩类型
    gzip_types
        text/plain
        text/css
        text/xml
        text/javascript
        application/json
        application/javascript
        application/xml+rss
        application/x-javascript;

    # 压缩代理缓存
    gzip_vary on;
}
浏览器缓存
nginx
location ~* \.(css|js|jpg|jpeg|png|gif|ico|svg|woff|woff2)$ {
    expires 30d;
    add_header Cache-Control "public, no-transform";
}

# 特定资源的缓存策略
location ~* \.(html|htm)$ {
    expires -1;
    add_header Cache-Control "no-store, no-cache, must-revalidate";
}
连接优化
nginx
http {
    # 文件传输优化
    sendfile on;
    tcp_nopush on;
    tcp_nodelay on;

    # 缓冲区优化
    client_body_buffer_size 10K;
    client_max_body_size 8m;

    # FastCGI缓存(PHP应用)
    fastcgi_cache_path /tmp/nginx-cache levels=1:2
                       keys_zone=APP_CACHE:100m
                       inactive=60m;

    fastcgi_cache_key "$scheme$request_method$host$request_uri";
    fastcgi_cache_valid 200 60m;
}
Worker进程优化
nginx
# 绑定worker进程到CPU核心
worker_cpu_affinity auto;

# Worker进程最大打开文件数
worker_rlimit_nofile 65535;

events {
    use epoll;          # Linux高性能事件模型
    worker_connections 65535;
    multi_accept on;
}
八、安全配置
基础安全配置
nginx
server {
    # 隐藏版本号
    server_tokens off;

    # 禁止IP直接访问
    if ($host != $server_name) {
        return 444;
    }

    # 限制请求方法
    if ($request_method !~ ^(GET|POST|HEAD)$) {
        return 405;
    }

    # 防止点击劫持
    add_header X-Frame-Options "SAMEORIGIN" always;

    # 防止XSS攻击
    add_header X-XSS-Protection "1; mode=block" always;

    # 内容安全策略
    add_header Content-Security-Policy "default-src 'self'" always;
}
限流配置
nginx
# 基于IP的限流
limit_req_zone $binary_remote_addr zone=REQ_ZONE:10m rate=10r/s;

server {
    # 突发请求限制
    location / {
        limit_req zone=REQ_ZONE burst=20 nodelay;
    }
}

# 基于连接的限流
limit_conn_zone $binary_remote_addr zone=CONN_ZONE:10m;

server {
    location / {
        limit_conn CONN_ZONE 5;
    }
}
九、日志配置与管理
自定义日志格式
nginx
http {
    # JSON格式日志(便于日志分析)
    log_format json_log escape=json
        '{'
        '"time":"$time_iso8601",'
        '"remote_addr":"$remote_addr",'
        '"host":"$host",'
        '"request":"$request",'
        '"status":"$status",'
        '"body_bytes_sent":"$body_bytes_sent",'
        '"request_time":"$request_time",'
        '"upstream_response_time":"$upstream_response_time",'
        '"http_referer":"$http_referer",'
        '"http_user_agent":"$http_user_agent"'
        '}';

    access_log /var/log/nginx/access.json json_log;
}
条件日志
nginx
server {
    # 不记录robots.txt的访问
    location = /robots.txt {
        log_not_found off;
        access_log off;
    }

    # 不记录健康检查
    location /health {
        access_log off;
    }
}
十、实战案例:完整LNMP架构配置
nginx
# /etc/nginx/nginx.conf
user nginx;
worker_processes auto;
error_log /var/log/nginx/error.log warn;
pid /var/run/nginx.pid;

events {
    worker_connections 10240;
    use epoll;
}

http {
    include /etc/nginx/mime.types;
    default_type application/octet-stream;

    # 日志格式
    log_format main '$remote_addr - $remote_user [$time_local] "$request" '
                    '$status $body_bytes_sent "$http_referer" '
                    '"$http_user_agent" "$http_x_forwarded_for"';

    access_log /var/log/nginx/access.log main;

    # 性能优化
    sendfile on;
    tcp_nopush on;
    tcp_nodelay on;
    keepalive_timeout 65;
    types_hash_max_size 2048;

    # Gzip压缩
    gzip on;
    gzip_vary on;
    gzip_proxied any;
    gzip_comp_level 6;
    gzip_types text/plain text/css text/xml application/json
                application/javascript application/xml+rss;

    # 上游服务器
    upstream php_backend {
        server 127.0.0.1:9000;
        keepalive 32;
    }

    upstream node_backend {
        server 127.0.0.1:3000;
        server 127.0.0.1:3001 backup;
    }

    # 主站配置
    server {
        listen 80;
        server_name example.com www.example.com;
        root /var/www/example;
        index index.php index.html;

        # SSL证书
        ssl_certificate /etc/ssl/certs/example.crt;
        ssl_certificate_key /etc/ssl/private/example.key;
        ssl_protocols TLSv1.2 TLSv1.3;

        # 安全头
        add_header X-Frame-Options "SAMEORIGIN";
        add_header X-Content-Type-Options "nosniff";

        # PHP处理
        location ~ \.php$ {
            fastcgi_pass php_backend;
            fastcgi_index index.php;
            fastcgi_param SCRIPT_FILENAME $document_root$fastcgi_script_name;
            include fastcgi_params;
        }

        # Node.js API代理
        location /api/ {
            proxy_pass http://node_backend;
            proxy_http_version 1.1;
            proxy_set_header Upgrade $http_upgrade;
            proxy_set_header Connection "upgrade";
        }

        # 静态资源
        location ~* \.(jpg|jpeg|png|gif|ico|css|js|svg|woff|woff2)$ {
            expires 30d;
            add_header Cache-Control "public, immutable";
        }

        # WordPress伪静态
        location / {
            try_files $uri $uri/ /index.php?$args;
        }
    }
}
十一、常见问题排查
配置语法检查
bash
# 测试配置语法
nginx -t

# 查看详细错误
nginx -t -c /path/to/nginx.conf

# 测试特定配置
nginx -t -c /path/to/nginx.conf
常用排查命令
bash
# 查看错误日志
tail -f /var/log/nginx/error.log

# 查看访问日志
tail -f /var/log/nginx/access.log

# 检查端口占用
netstat -tlnp | grep nginx
ss -tlnp | grep nginx

# 检查进程
ps aux | grep nginx

# 重新加载配置(不中断服务)
nginx -s reload

# 优雅关闭
nginx -s quit

# 强制关闭
nginx -s stop
十二、总结
本教程全面介绍了Nginx的各个方面:
- 基础安装和配置结构
- 静态网站托管和目录浏览
- 反向代理和WebSocket支持
- 多种负载均衡策略
- SSL/HTTPS安全配置
- 性能优化技巧
- 安全防护措施
- 日志管理和问题排查
掌握这些内容后,你已经能够独立配置和管理Nginx服务器。推荐进一步学习Nginx的缓存机制、容器化部署以及与Kubernetes的集成等高级话题。
相关资源:
阅读更多:
发表回复